· Hakan Çelik · OpenCV / Advanced Topics · 4 dk okuma
Histograms - Histogram Equalization
Histogram Equalization
Goals
In this section:
- We will learn the concepts of histogram equalization and use it to improve the contrast of our images.
Theory
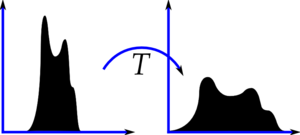
Consider an image whose pixel values are confined to some specific range of values only. For example, brighter image will have all pixels confined to high values. But a good image will have pixels from all regions of the image. So you need to stretch this histogram to either ends — that is what Histogram Equalization does (in simple words). This normally improves the contrast of the image.
We recommend reading the Wikipedia page on Histogram Equalization for more details. Here we will see its Numpy implementation. After that, we will see OpenCV function.
Histogram Equalization in Numpy
import numpy as np
import cv2 as cv
from matplotlib import pyplot as plt

img = cv.imread('wiki.jpg', cv.IMREAD_GRAYSCALE)
assert img is not None, "file could not be read, check with os.path.exists()"

hist, bins = np.histogram(img.flatten(), 256, [0, 256])

cdf = hist.cumsum()
cdf_normalized = cdf * float(hist.max()) / cdf.max()

plt.plot(cdf_normalized, color='b')
plt.hist(img.flatten(), 256, [0, 256], color='r')
plt.xlim([0, 256])
plt.legend(('cdf', 'histogram'), loc='upper left')
plt.show()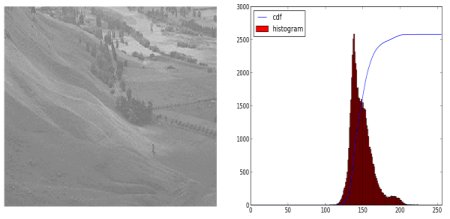
You can see histogram lies in brighter region. We need the full spectrum. For that, we need a transformation function which maps the input pixels in brighter region to output pixels in full region. That is what histogram equalization does.
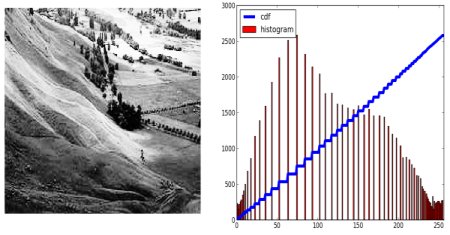
Now find the minimum histogram value (excluding 0) and apply the histogram equalization equation:
cdf_m = np.ma.masked_equal(cdf, 0)
cdf_m = (cdf_m - cdf_m.min()) * 255 / (cdf_m.max() - cdf_m.min())
cdf = np.ma.filled(cdf_m, 0).astype('uint8')
Now we have the look-up table. Apply the transform:
img2 = cdf[img]Result looks like below:
An important feature is that even if the image was a darker image, after equalization we will get almost the same image. This is used as a “reference tool” to make all images with same lighting conditions. For example, in face recognition, before training the face data, the images of faces are histogram equalized.
Histograms Equalization in OpenCV
OpenCV has a function to do this, cv2.equalizeHist(). Its input is just grayscale image and output is our histogram equalized image:
img = cv.imread('wiki.jpg', cv.IMREAD_GRAYSCALE)
assert img is not None, "file could not be read, check with os.path.exists()"
equ = cv.equalizeHist(img)
res = np.hstack((img, equ))  # stacking images side-by-side
cv.imwrite('res.png', res)
Histogram equalization is good when histogram of the image is confined to a particular region. It won’t work well where histogram covers a large region (both bright and dark pixels are present).
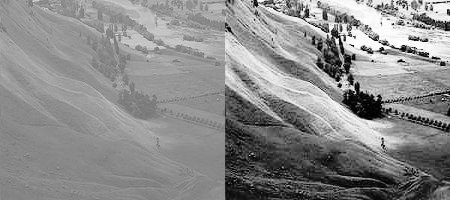
CLAHE (Contrast Limited Adaptive Histogram Equalization)
The first histogram equalization considers the global contrast of the image. In many cases, it is not a good idea. For example, below image shows an input image and its result after global histogram equalization:
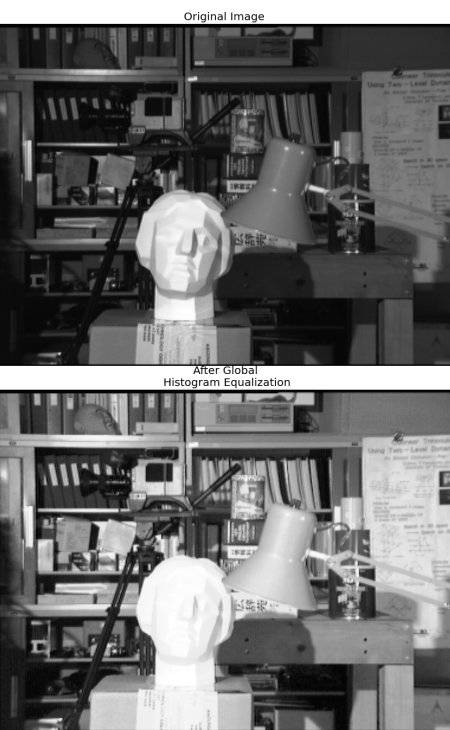
It is true that the background contrast has improved. But compare the face of statue in both images — we lost most of the information there due to over-brightness.
So to solve this problem, adaptive histogram equalization is used. In this, image is divided into small blocks called “tiles” (tileSize is 8x8 by default in OpenCV). Then each of these blocks are histogram equalized. If any histogram bin is above the specified contrast limit (by default 40 in OpenCV), those pixels are clipped and distributed uniformly to other bins before applying histogram equalization. After equalization, bilinear interpolation is applied to remove artifacts in tile borders.
Below code snippet shows how to apply CLAHE in OpenCV:
import numpy as np
import cv2 as cv

img = cv.imread('tsukuba_l.png', cv.IMREAD_GRAYSCALE)
assert img is not None, "file could not be read, check with os.path.exists()"

# create a CLAHE object (Arguments are optional).
clahe = cv.createCLAHE(clipLimit=2.0, tileGridSize=(8, 8))
cl1 = clahe.apply(img)

cv.imwrite('clahe_2.jpg', cl1)
See the result below and compare it with results above, especially the statue region: