· Hakan Çelik · OpenCV / Advanced Topics · 3 dk okuma
Contours: More Functions
Contours: More Functions
Goals
In this chapter, we will learn about:
- Convexity defects and how to find them.
- Finding shortest distance from a point to a polygon
- Matching different shapes
1. Convexity Defects
We saw what is convex hull in second chapter about contours. Any deviation of the object from this hull can be considered as convexity defect.
OpenCV comes with a ready-made function to find this, cv2.convexityDefects(). A basic function call would look like below:
hull = cv.convexHull(cnt, returnPoints=False)
defects = cv.convexityDefects(cnt, hull)
Note: Remember we have to pass
returnPoints=Falsewhile finding convex hull, in order to find convexity defects.
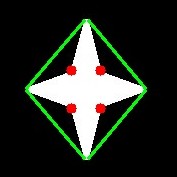
It returns an array where each row contains these values - [start point, end point, farthest point, approximate distance to farthest point]. We draw a line joining start point and end point, then draw a circle at the farthest point:
import cv2 as cv
import numpy as np

img = cv.imread('star.jpg')
assert img is not None, "file could not be read, check with os.path.exists()"
img_gray = cv.cvtColor(img, cv.COLOR_BGR2GRAY)
ret, thresh = cv.threshold(img_gray, 127, 255, 0)
contours, hierarchy = cv.findContours(thresh, 2, 1)
cnt = contours[0]

hull = cv.convexHull(cnt, returnPoints=False)
defects = cv.convexityDefects(cnt, hull)

for i in range(defects.shape[0]):
    s, e, f, d = defects[i, 0]
    start = tuple(cnt[s][0])
    end = tuple(cnt[e][0])
    far = tuple(cnt[f][0])
    cv.line(img, start, end, [0, 255, 0], 2)
    cv.circle(img, far, 5, [0, 0, 255], -1)

cv.imshow('img', img)
cv.waitKey(0)
cv.destroyAllWindows()
And see the result:
2. Point Polygon Test
This function finds the shortest distance between a point in the image and a contour. It returns the distance which is negative when point is outside the contour, positive when point is inside and zero if point is on the contour.
For example, we can check the point (50,50) as follows:
dist = cv.pointPolygonTest(cnt, (50, 50), True)In the function, third argument is measureDist. If it is True, it finds the signed distance. If False, it finds whether the point is inside or outside or on the contour (it returns +1, -1, 0 respectively).
Note: If you don’t want to find the distance, make sure third argument is False, because it is a time consuming process. Making it False gives about 2-3X speedup.
3. Match Shapes
OpenCV comes with a function cv2.matchShapes() which enables us to compare two shapes, or two contours and returns a metric showing the similarity. The lower the result, the better match it is. It is calculated based on the hu-moment values:
import cv2 as cv
import numpy as np

img1 = cv.imread('star.jpg', cv.IMREAD_GRAYSCALE)
img2 = cv.imread('star2.jpg', cv.IMREAD_GRAYSCALE)
assert img1 is not None, "file could not be read, check with os.path.exists()"
assert img2 is not None, "file could not be read, check with os.path.exists()"

ret, thresh = cv.threshold(img1, 127, 255, 0)
ret, thresh2 = cv.threshold(img2, 127, 255, 0)
contours, hierarchy = cv.findContours(thresh, 2, 1)
cnt1 = contours[0]
contours, hierarchy = cv.findContours(thresh2, 2, 1)
cnt2 = contours[0]

ret = cv.matchShapes(cnt1, cnt2, 1, 0.0)
print(ret)
I tried matching shapes with different shapes given below:
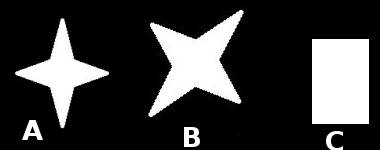
I got following results:
- Matching Image A with itself = 0.0
- Matching Image A with Image B = 0.001946
- Matching Image A with Image C = 0.326911
See, even image rotation doesn’t affect much on this comparison.
Note: Hu-Moments are seven moments invariant to translation, rotation and scale. Seventh one is skew-invariant. Those values can be found using
cv2.HuMoments()function.
Exercises
- Check the documentation for
cv2.pointPolygonTest(), you can find a nice image in Red and Blue color representing distance from all pixels to the white curve. - Compare images of digits or letters using
cv2.matchShapes(). (That would be a simple step towards OCR)